At a glance
A pallet compost bin is one of the most practical projects in the kitchen garden – free or nearly free to build, large enough to produce meaningful quantities of compost, and straightforward to construct in a couple of hours. Four pallets standing upright and wired together at the corners produce a cubic metre bin that can hold a full season of garden and kitchen waste and convert it into rich, dark compost that transforms soil structure in beds, borders and raised beds. For anyone with access to pallets – which are freely available from most builders merchants, DIY stores, garden centres and industrial premises – the only real cost is a handful of cable ties or galvanised wire to hold the corners together.
The compost from a well-managed pallet bin is genuinely useful material – not the same product as bagged compost from a garden centre, but something arguably better for UK growing conditions. Homemade garden compost is lower in nutrients than commercial products but richer in microbial life, better at improving soil structure and water retention, and perfectly calibrated to the organic material available in your garden. Incorporated into a raised bed soil mix or used as a surface mulch on borders, it provides the same long-term soil improvement that expensive bought products deliver – at zero cost once the bin is in place.
Choosing safe pallets
The stamp to look for on every pallet is HT – heat treated. This is the international ISPM-15 standard for wood packaging, and HT pallets are the only type that should be used in a food garden or where the compost will be applied to soil. The MB stamp indicates methyl bromide treatment, a toxic fumigant that persists in the wood and can contaminate compost and soil – discard any MB-stamped pallets immediately. The stamp is typically printed or branded onto the side rail of the pallet, often alongside the country code and manufacturer mark.
Beyond the treatment stamp, look for pallets in good structural condition – no cracked or missing boards, no visible staining from chemical spills, and ideally from a known source such as a garden centre, food warehouse or builders merchant rather than an industrial chemical supplier. Standard UK pallets measure 1200mm x 1000mm – this size produces a well-proportioned bin. Euro pallets (1200mm x 800mm) are slightly narrower and also work well. Avoid pallets that smell strongly of chemicals, show dark staining that cannot be explained, or have been used for chemical storage.
Building the bin – single and three-bay
Single bay bin (4 pallets): Stand three pallets upright to form three sides of a square, securing the corners with galvanised wire or heavy-duty cable ties looped through the slats at the top, middle and bottom of each corner. The fourth pallet forms the front and is attached at one side only with wire loops that can be undone, creating a hinged front panel that swings open for access when turning or removing compost. Alternatively, leave the front completely removable by securing it with hooks and eyes. Position the bin on bare soil rather than paving – contact with the ground allows beneficial organisms, worms and moisture to move into the bin naturally.
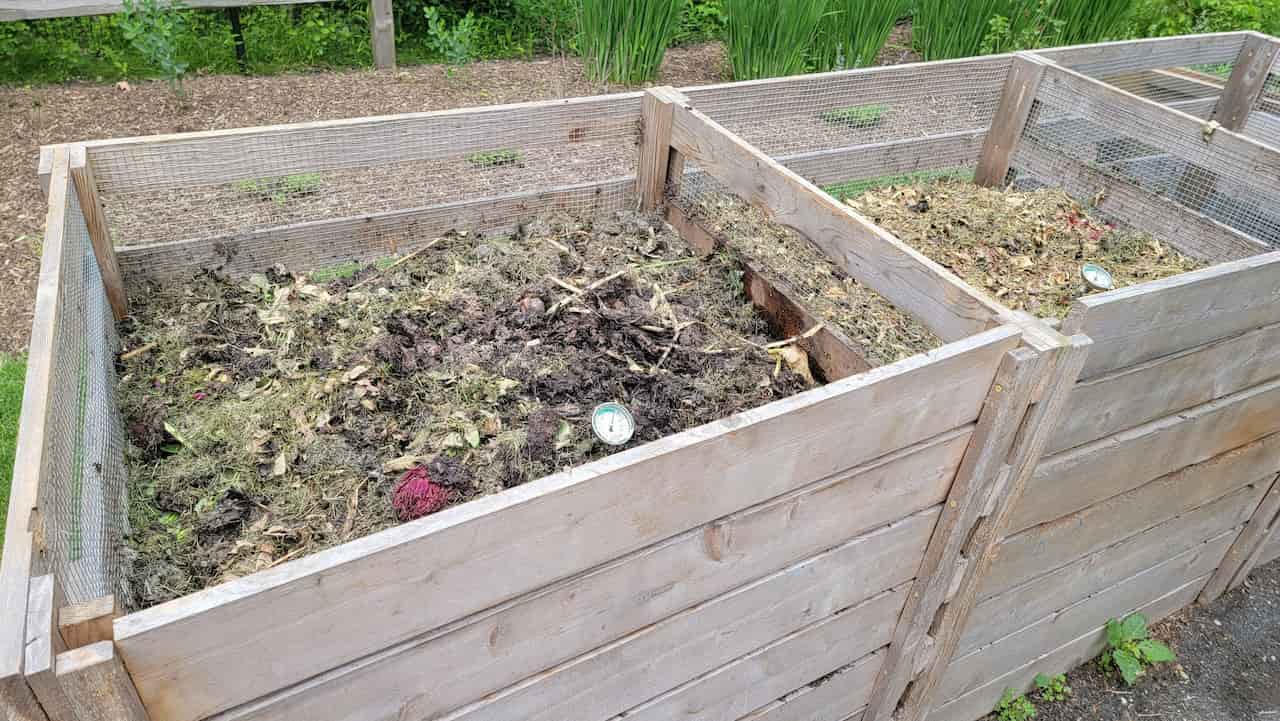
Three-bay system (10-12 pallets): The three-bay system is far more productive and is the preferred design for anyone producing meaningful quantities of compost. Bay one receives fresh material continuously. When bay one is full, the contents are turned into bay two to continue composting, and bay one begins filling again. When bay two material has broken down, it moves into bay three to mature, freeing bay two for the turning from bay one. Bay three holds the finished or nearly finished compost ready to use. This rotation means compost at various stages of decomposition is always available and the process never stalls. Build the three-bay system by constructing three adjoined squares sharing their dividing walls, with the front panels of each bay removable for turning access. This is the same system used on well-managed allotments and is well worth the additional pallets if the space is available – a raised bed and a proper compost system together transform the productivity of a kitchen garden.
Whichever design you build, line the inside walls with cardboard or hessian sacking to retain moisture and insulate the heap through winter. The front pallets or panels should be left unlined so you can inspect and access the heap easily. Fit a loose cover – old carpet, a sheet of plywood or purpose-made compost bin lids – over the top of the heap to retain heat and moisture in dry weather and prevent the heap becoming waterlogged in the wet UK winters.
What to compost – and what to avoid
The key to fast, effective composting is balancing green materials (nitrogen-rich, wet) with brown materials (carbon-rich, dry). Too much green material alone produces a wet, smelly, anaerobic heap that breaks down very slowly. Too much brown material produces a dry, inactive heap that barely decomposes. The ideal ratio is roughly equal volumes of green and brown by weight – in practice, adding a layer of cardboard, torn paper or wood chip between each bucket of grass clippings or kitchen scraps keeps the heap balanced. Avoid adding meat, fish or cooked food to an open pallet bin – these attract rats, which are a common allotment pest. If you want to compost cooked material, a sealed bokashi system or a purpose-built rat-proof caddy is more appropriate.
Hot vs cold composting
Cold composting is the default approach for most UK home gardeners – material is added gradually as it is produced, the heap is occasionally turned, and finished compost is ready in six to twelve months. It requires very little management, produces good compost eventually, and suits the typical pattern of garden waste generation through the season. The disadvantage is that the heap rarely reaches temperatures high enough to kill weed seeds or disease pathogens, so seeding weeds and diseased plant material should be excluded.
Hot composting produces finished compost in eight to twelve weeks and kills weed seeds, pathogens and most pest eggs in the process. It requires building the heap to a minimum volume of approximately one cubic metre in a single session with the correct green-to-brown ratio, then turning the heap every three to five days to introduce oxygen and maintain the temperature. A well-managed hot heap reaches 55-70°C in the centre within days – a garden thermometer confirms whether the process is working correctly. This method is more demanding but produces better compost faster and is the approach used on productive allotments where large quantities of waste and a high demand for compost make speed worthwhile. The three-bay pallet system described above is ideally suited to hot composting – turning from bay one into bay two reintroduces oxygen and restarts the heating process each time.
Attracting wildlife to and around the compost bin improves decomposition naturally. Slow worms are among the most beneficial compost heap inhabitants in UK gardens – they consume slugs, soil invertebrates and larvae, and their presence indicates a healthy, active heap. Create sheltered spots around the bin using roof tiles, flat stones or corrugated sheeting left on the ground nearby to provide basking habitat that encourages slow worms to establish.
Using your compost
Finished compost is dark, crumbly, earthy-smelling material with no recognisable original ingredients remaining – it should resemble rich, dark soil rather than partially rotted vegetation. If the compost still contains identifiable plant material or smells sour or unpleasant, it needs more time or another turn. Sieve finished compost through a 10mm mesh to remove any large undecomposed pieces, which go back into the active heap for further composting.
The best uses for homemade compost in a UK garden are as a surface mulch on borders and beds (applied 5-8cm deep in autumn or spring), as a component in a raised bed soil mix, or as a top-dressing for the lawn in autumn applied thinly and raked in. It is less suitable as a seed-sowing medium on its own – homemade compost is too variable and often too rich in nitrogen, which can inhibit germination. For seed sowing, mix one part homemade compost with one part sharp sand and one part peat-free proprietary compost for a free-draining, lower-nutrient mix that suits young seedlings. The quality and quantity of homemade compost improves significantly each year as the composting system matures and the balance of inputs is refined.
Add compost activator to kick-start a slow heap. If a heap has been cold and inactive for several weeks with no visible decomposition, adding a nitrogen-rich activator speeds up microbial activity rapidly. Nettles, fresh grass clippings, poultry manure pellets, or a proprietary compost activator product all work well. Spread a thin layer between existing material, water if the heap is dry, cover and leave for a week before checking temperature again. A well-managed heap should feel noticeably warm in the centre within a few days of adding activator – if it remains cold, the carbon-to-nitrogen ratio may be too high and more green material is needed.
Common problems and solutions
Share on socials: